JavaScript becomes a big hero in these days. If you think about the few years back developers use it only for the client side scripting. But now the time has changed the game. Nowadays JavaScript is really powerful and can use for developing server side functions too. Because of this growth in development in JavaScript, it opens up many paths to thinks to the developer when to do the development. Unit testing is one of the major component of the development process with the rise of the TDD approach. The as much as you do unit testing you can make an assurance about the small pieces of the business logic works as according to expectation.
As I said in earlier with the growth of the capabilities in the JavaScript, arise a requirement of the applying TDD approach for the client – side as well. To achieve this TDD approach in client – side developer have to work with a set of tools. In this post aim is to start to write a first unit test in JavaScript. The set of tools going to use for this mention in below.
1). Test Runner – Karma
2). Test Framework – Mocha
3). Test Assertion Tool – Chai
My Folder structure in project,
project/
src/Inside src folder contain all business logic JavaScript files and test folder contains the unit test JavaScript files. Nodejs module contain in node_modules folder. Using
test/
node_modules/
npm init command create package.json file.Following command line installs karma, mocha, chai assertion library, mocha and chai adapter for the karma at once.
npm install karma mocha chai karma-mocha karma-chai --save-devIn here we installed karma locally. Benefit of it use we can use different karma version in different projects. But when we start to work with karma, we have to go to bin folder of the karma local installation. So this is bring additional effort to the developer. Run following command to avoid this situation. Before do this needs to uninstall the globally install karma version.
npm install –g karma-cli
Now run below command and create karma configurations.
karma init
After you provide successful answers to the questions ask by the karma configuration process you get the file as in below.
// Karma configuration

module.exports = function(config) {
  config.set({

    // base path that will be used to resolve all patterns (eg. files, exclude)
    basePath: '',


    // frameworks to use
    // available frameworks: https://npmjs.org/browse/keyword/karma-adapter
    frameworks: ['mocha'],


    // list of files / patterns to load in the browser
    files: [
      'src/**/*.js',
      'test/**/*.spec.js'
    ],


    // list of files to exclude
    exclude: [
    ],


    // preprocess matching files before serving them to the browser
    // available preprocessors: https://npmjs.org/browse/keyword/karma-preprocessor
    preprocessors: {
    },


    // test results reporter to use
    // possible values: 'dots', 'progress'
    // available reporters: https://npmjs.org/browse/keyword/karma-reporter
    reporters: ['progress'],


    // web server port
    port: 9876,


    // enable / disable colors in the output (reporters and logs)
    colors: true,


    // level of logging
    // possible values: config.LOG_DISABLE || config.LOG_ERROR ||
    // config.LOG_WARN || config.LOG_INFO || config.LOG_DEBUG
    logLevel: config.LOG_INFO,


    // enable / disable watching file and executing tests whenever any file changes
    autoWatch: true,


    // start these browsers
    // available browser launchers: https://npmjs.org/browse/keyword/karma-launcher
    browsers: ['Chrome'],


    // Continuous Integration mode
    // if true, Karma captures browsers, runs the tests and exits
    singleRun: false,

    // Concurrency level
    // how many browser should be started simultanous
    concurrency: Infinity
  })
}
In here we installed karma locally. The benefit of it is we can use different karma version in different projects. But when we start to work with karma, we have to go to the bin folder of the karma local installation. So this brings additional effort to the developer. Run the following command to avoid this situation. Before do this needs to uninstall the global install karma version.
Now im going to write my first unit test in “test.spec.js” file as in below.
describe("A test suite", function() {

    var num1 = 0;

   beforeEach(function() {
         num1 += 10
   });

   afterEach(function() {

   });

   it('should fail', function() {
        expect(num1).to.equal(11);
         });
});
In this test, I created a variable call “num1” and adding the 10 for it each time before test gets to run. The “beforeEach” function runs before all the unit test and “afterEach” function get run after each unit test. In here I use mocha as test framework and chai for assertions for the write unit test. The expect style assertion give the capability to write unit tests in BDD way.
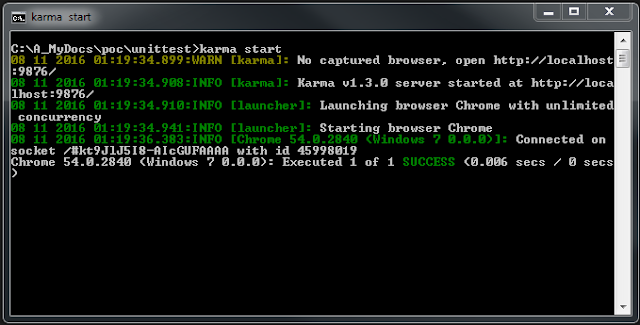
Now start to run unit tests by enter following command as “karma start”. Then you see chrome browser and unit test start to run. Following images shows the result of the unit test run.

Now you have written your first unit test and run it. Until the next post, Happy Coding


