Monday, March 17, 2014

Phonegap App development with VS and Nomad

Recently I was working with cross-platform mobile application development and I'm in a situation how to do it with visual studio. Another requirement was debug application with simulator. For fulfil these requirement I found Nomad extension for visual studio. This is support visual studio 2013, 2012 and 2013. I'm going to show you how to start development with nomad and visual studio.

First of all download extension form this link.
After you install nomad extension it will show up in visual studio project templates as shown in below.


 For create nomad project first you have to create PhoneGap build account or if you already have account use it. When project creating in visual studio, pop-up will appear and ask the credential of PhoneGap account. Enter login details create the project as shown in below. Enter project name as "MyFirstMobileApp". Then you can see visual studio create the project with basic files needed to develop cross-platform mobile application.


Project files contain with basic files of Jquery mobile javascript and style. Most importantly thing is project files contain with cordova.js file and PhoneGap configuration file.  And also this contain with index.html file which is the start page of the application all the time.

Go to project properties. In General tab shows the project settings as shown in below. In project setting page you can configure app display name, version, build option, cordova vesrion and preview your mobile app. In preview your mobile app section give you the option see your app through default browser or through Ripple emulator.


In Android and IOS tab you can configure build setting for PhoneGap. You have to setup those configuration first to make the build file from PhoneGap. Last tab in project properties is Artwork. In this tab you can upload splash screen and icons for Android and IOS.


As I mention earlier in this post project files contain with PhoneGap configuration file. You can do all PhoneGap configuration with config.xml file. Below image shows configuration file. Its shows all the configuration set up and icons uploaded to android and ios.


Run your project selecting Nomad for visual studio simulator from project properties under preview your mobile app. Then Ripple simulator shows up as shown in below.


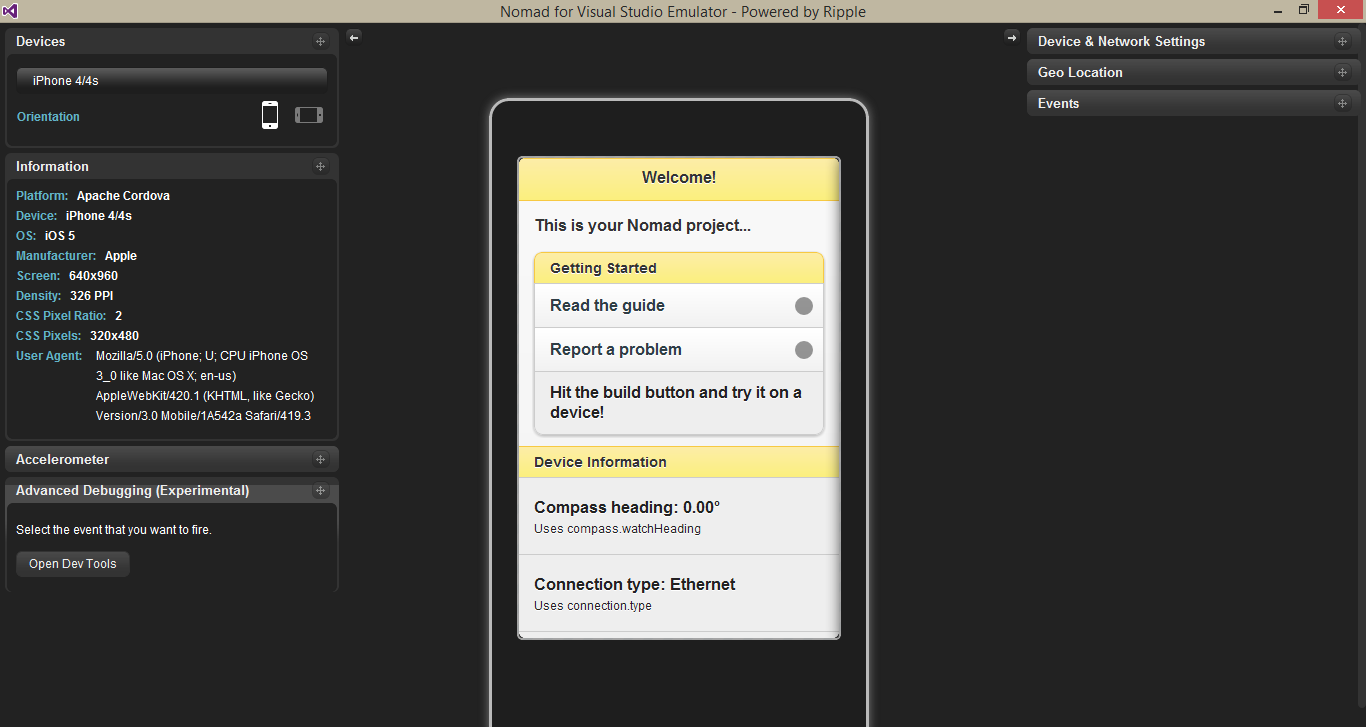
You can see in this simulator shows many details like in native app development simulators.You can select different set of devices for android development. Also this shows the settings for accelerometer, geo location, device and network settings and events. Clicking on 'Open Dev Tools' you can debug your JavaScript code and check your html.


In this article describe the information for the start cross-platform mobile app development with Nomad and Visual Studio. In next article describe the creating mobile application with Nomad and JQuery Mobile. 

Tuesday, February 18, 2014

The Arrival of NoSQL

In business system analysis one of the main part is how system data being store, retrieve and manipulate to business operations. End result of this process is create the schema for the business system. This schema consist with collection of relation tables and views. But in this relational database model its own limitation and drawbacks. We can list down some of factors as in below.
  • Relational database model can take long time to perform complete data analysis and design schema. In business user expect their system quickly up and running. 
  • Relational database design consist with tables and developers should access it using SQL. But business logic develop through objects and methods. So overcome this mismatch between database model and programming model, we have to use ORM like Entity Framework.
  • Relational databases are very difficult to modify if more application depends on it. If change one place it can effect to the many place in the business application.
  • In some scenarios relational database not able show all business requirement relationship. 
  • Many high end relational database systems more expensive when going for a scalability and high - availability. And also licencing cost for the product.  
To address these limitation of flexibility, availability, Performance and scalability which has in relational database brought NoSQL database to the table.  In other words "Non - Relational Database". NoSQL databases categorize  into a small set of functional areas: key/value stores, document databases, column-family databases, and graph databases.  

Key/Value stores

A key/value store implements simplest of the NoSQL storage mechanismsl. A key/value store is large hash table. Each data value associate with a unique key, and the key/value store uses this key to determine where to store the data in the database by using an appropriate hashing function. The hashing function is selected to provide an even distribution of hashed keys across data storage. 


Document Databases

A document database is similar in concept to a key/value store except that the values stored are documents. A document is a collection of named fields and values, each of which could be simple scalar items or compound elements such as lists and child documents. The data in the fields in a document can be encoded in a variety of ways, including XML, YAML, JSON, BSON, or even stored as plain text.

Column-family Database

A column-family database store its data into rows and columns, and in its simplest form a column-family database can appear very similar to a relational database, at least conceptually. The real power of a column-family database lies in its denormalized approach to structuring sparse data.

Graph Databases

Same like other categories of NoSQL databases, a graph database enables to store entities, but the main focus is on the relationships that these entities have with each other. A graph database stores two types of information; 
  • Nodes which is instances of entities 
  • Edges which specify the relationships between nodes. 
Nodes and edges can both have properties that provide information about that node or edge just like columns in a table. Edges can have a direction indicating the nature of the relationship. The purpose of a graph database is to enable an application to efficiently perform queries that traverse the network of nodes and edges, and to analyse the relationships between entities. 

Wednesday, February 12, 2014

Threading to JavaScript 3


The second post of this article series shows small application with web worker. This post going to shows web worker with JSON. Please refer first post and second post.

Following shows main page HTML structure. Main page has three buttons with respective onclick event handler. One button for send JSON data to the web worker, another button for get JSON data from web worker and third button for terminate web worker from JSON message.

Web worker demo

Following shows main page JavaScript code. First part of this code contain implementation for start web worker and it contain with onmessage event listener for web worker object. After that it has implementation of onclick event handler in each buttons. Inside those methods create JSON object to send web worker. 

Following shows doWebWorker.js file implementation. Inside the switch statement check JSON object. For Get request create new JSON object and send back to the main page.

var message;
that = this;
self.addEventListener('message', function (e) { 
 
 var data = e.data;
 switch (data.cmd) {
  case 'send':
   that.sendMessage('WORKER RECEIVED JSON DATA: ' + data.msg);
   break;
  case 'get':
   var val = {
    'cmd': 'WORKER SEND JSON DATA',
    'msg': 'worker said hi !'
   }
   that.sendMessage(val);
   break;
  default:
   that.sendMessage('WORKER STOPPED: ' + data.msg);
   // Terminates the worker.
   that.terminatesWorker();
 };
}, false);

function sendMessage(message)
{
 self.postMessage(message);
}

function terminatesWorker() {
 self.close();
}

Final result looks like shown in below.


Result of Send Json button click

Result of Get Json button click

Result of Stop Worker button click

Wednesday, January 15, 2014

Threading to JavaScript 2

The previous post explained about basics of web worker. In this post going to describe a small application created using web worker. In this demo shows add two numbers using web worker. Following HTML shows two inputs.

Web worker demo

Add numbers
Following JavaScript code reside in main page. This code start web worker and attach with event handlers.


JavaScript code snippet of doWebWorker.js,
var message;
that = this;
self.addEventListener('message', function (e) { 
 
 var sum = parseInt(e.data[0]) + parseInt(e.data[1]);
 var workerResult = 'Result: ' + sum;
 that.sendMessage(workerResult);
}, false);

function sendMessage(message)
{
 self.postMessage(message);
}

Following image shows the end result.


Tuesday, December 17, 2013

Threading to JavaScript 1

JavaScript is a single-threaded environment. Simply if you wants run multiple scripts at the same time you cant achieve that requirement with JavaScript. Think about the scenario in a web site you wants to retrieve data through AJAX, needs to do manipulation in UI and DOM at the same time. But you can do this because of script execution happens within a single thread. So in currently what you do normally achieve this kind of goal. You use techniques like setTimeout(), setInterval(), XMLHttpRequest, and event handlers. But in HTML5 gives to you better option than these workarounds. That is Web Worker.

A web worker is a JavaScript that runs in the background, independently of other scripts, without affecting the performance of the page. perfect for keeping your UI refresh, performant, and responsive for users. There are two types of web workers, Dedicated Workers and Shared Workers. In this article discuss about Dedicated web worker.

Let's do small demo about web worker. Create HTML content like below with two buttons. Those two buttons bind with 'onClick' event.

Web worker demo

Create script like below with two onClick events. First of all check whether browser support web worker. After check Worker object create or not. If it not create new object. If the web worker file exists, the browser will spawn a new worker thread, which is downloaded asynchronously. The worker will not begin until the file has completely downloaded and executed. If file not exists returns an 404, the worker will fail silently. Communication between a work and its parent page is done using an event model and the postMessage() method.


Following script shows the content of doWebWorker.js file. In this javascript file capture message from main page send data back to main page. And also worker terminate operation contain in this separate script file.
var message;
that = this;
self.addEventListener('message', function (e) {  
 //basic demo
 message = e.data;
 that.sendMessage(message);
}, false);

function sendMessage(message)
{
 self.postMessage(message);
}

When click Start Worker button send message to the web worker and eventlistener of web worker catch it send back to the main page. When click Stop Worker button terminate web worker.


Tuesday, December 10, 2013

Caching in ASP.NET MVC : What, Why and How

What is Caching in ASP.NET MVC ?

Caching is process of storing frequently used information and within high speed memory.


Why do we need caching in ASP.NET MVC ?

Most of the times ASP.NET application requirements makes the scenario to get user and page data from the server in all most every request. Because of this kind of accessing data from server each time directly effect the application performance. To avoid this kind performance and latency issues we can use Caching mechanism.

How do we manage caching in ASP.NET MVC ?

Page Output Caching
- In this method browser cache HTTP GET request for predefined time period. When user request same URL again that call not going to server, instead of that it returns already cache page. Following code snippet show the way of doing it.

[OutputCache(Duration=60, VaryByParam="None", Location="ServerAndClient")] Public ActionResult Index() { return View("Index"); }

Duration defined the time period caching should happen. Setting by location says where we wants to do the caching. In this code it done by both of server and client. Because of that user who request this url from another browser also not send the request to the server. We can defined place to locate the cache. VaryByParam create the different version of cache based on the form or query string parameters. You can create cache profile in the web config and use it in with controller.

Donut and Donut Hole Caching
- Donut and Donut hole caching also belongs to the page caching mechanism. But these two methods not cache full page like in output cache. Donut cache is the server side methodology and it cache entire page other than pieces of dynamic content. Donut hole cache do the opposite of it cache selected sections of the page and not cache entire remaining part of the page.

Windows App Fabric Caching Service
- In web farm solution implementing the caching mechanism getting more complex because of each server share the information created in one sever. To solve this kind of scenario use windows app fabric caching service. ASP.NET is the cache client. Cache client can hold the cache in it local store and communicate with cache cluster. When request the data first look in the local store then it look for the cache cluster. If cache cluster not contain that information looking for then it has go to original information source and get it.  

Data Caching 
- In your business application most of the time request same data frequently. This process directly effect to the performance of the application. Data caching is the solution for this kind scenario. Data caching can apply to the layers between data access and business logic. In between these two layers can cache the frequently request data then each time no need to make database request. Data caching use ObjectCache  and MemoryCache objects for the implementation. 

Application Caching 
- In this method use Application Cache API (AppCache) in HTML5. This give access to the local browser cache. To use application cache needs to create application cache manifest, reference manifest and transfer manifest to the client. When application cache enabled browser fetch it only three cases,
a). When makes the any changes to the manifest
b). When clear the cache by user
c). When cache updated by programmatically


Wednesday, April 10, 2013

State Management : What, Why and How


In this article focus on state management in ASP.NET MVC.

What is state management ? 


State Management is the process followed by developers in web application development to maintain state and page information over multiple request for the same or different pages.


Why do we need to manage state ?

The main way of communicating with internet  HTTP. This HTTP protocol is stateless. It doesn't know anything about last request. Not having to remember user's last request web server can handle many concurrent users. ASP.NET MVC is designed with this stateless nature of HTTP. Because of this reason when we needs to remember user last request or user information we have to take the approach of state management.

 How do we manage state in ASP.NET MVC ?

Client - Side 

Cookies  - small set of information passed to there server in every HTTP request. According to the requirement can set the expiration time for the cookies.

Query String - information appended to the URL. For secure the information can use HTTPS.

Hidden fields - Store value in the form hidden field. this value can use to send sever and operation of the client side.

Server - Side

Cache - cache object available for the all class within the application. This cache object can access through any user or page in the application domain.


Session - Information stored in the server and unique for the each user. There are mainly two method of session management which are InProc and OutProc. InProc use the web server memory and it comes with by default in IIS. In distributed application needs to use OutProc method. There are two method in OutProc way which are State server and SQL server. To use these methods in distribute application have to made changes to web config.

Profile - Information stored based on user name in a database. The profile is part of Membership and Roles provider.