Tuesday, May 13, 2014

Sequence of SQL Query Statement

As a developer all of us write SQL queries for access and manipulate data in  the database. When retrieve data from database SQL query start with SELECT statement. In these SQL queries are create English-like manner. But its logical execution not process like that way. The SELECT statement logically execute in following order.

  1. FROM
  2. WHERE
  3. GROUP BY
  4. HAVING 
  5. SELECT
  6. ORDER BY 
Following SQL query retrieve employee detail from EmployeeLeave table. 


SELECT EmpId, FirstName, COUNT(*) AS NumLeaves
FROM EmployeeLeave
WHERE EmpId = 12
GROUP BY DepId, LeaveYear
HAVING COUNT(*) > 1
ORDER BY EmpId, DepId

But this query logically process in following manner. 

FROM EmployeeLeave
WHERE EmpId = 12
GROUP BY DepId, LeaveYear
HAVING COUNT(*) > 1
SELECT EmpId, FirstName, COUNT(*) AS NumLeaves
ORDER BY EmpId, DepId

Following shows the way of this query works,
  1. Queries the rows from EmployeeLeave table
  2. Filters only records where employee ID equal to 12
  3. Groups the records by department ID and leave year
  4. Filters only groups having more than one leave
  5. Selects for each group the employee ID, first name and number of leaves
  6. Order the rows in the output by employee ID and department ID
The knowing the way of logical execution of SQL query is very important when write the queries for our business scenarios. It give us more understand about how our query works and its a big help to structure the query as well.  

Saturday, April 26, 2014

PhoneGap App : Google Map MarkerClusterer

In last post I was described how to get current location and show it as marker in the map. Let's think a scenario which is you have to show lot of markers in the map. In this case map going to be the fill with markers and user can't get an idea on looking at the map. This going to be loose the user experience. So solution for this kind of a requirement is group the markers in the map. There are various approaches for achieve the solution for this. Today I'm going to explain one method belongs to Clustering which is MarkerClusterer. Clustering  is simplifies your data visualization by consolidating data that are nearby each other on the map in an aggregate form.

The MarkerClusterer is a client side library. This use grid-based clustering to a collection of markers. It works by iterating though the markers in the collection that you wish to cluster and adding each one into the closest cluster if it is within in a minimum square pixel bounds. For demo this approach I used the previous post implementation as basement. Actually this is a extending the previous post implementation.

To develop marker clusterer in your application first you have to reference it in your HTML page. You can download the markerclusterer.js from here. Other than there is no any changes in the HTML page from the previous post.

<!DOCTYPE html> <html> <head> <title>Map View</title> <link href="style/jquery.mobile-1.4.2.css" rel="stylesheet" /> <meta name="viewport" content="width=device-width, initial-scale=1" /> </head> <body> <div data-role="page" id="map-page" data-url="map-page"> <div data-role="header"> <span style="align-content:center;">Map</span> </div> <div data-role="content" data-position="fixed" id="map_canvas"> <!-- map loads here... --> </div> <div data-role="footer"> Footer </div> </div> <!--Jquery--> <script type="text/javascript" src="scripts/jquery-1.9.1.min.js"></script> <!--Jquery Mobile--> <script type="text/javascript" src="scripts/jquery.mobile-1.4.2.js"></script> <!--Cordova--> <script type="text/javascript" src="scripts/cordova.js"></script> <!--Google Map--> <script type="text/javascript" src="https://maps.googleapis.com/maps/api/js?v=3&amp;sensor=true&amp"></script> <!--Google Map Marker Cluster--> <script type="text/javascript" src="scripts/markerclusterer.js"></script> <!--Map View--> <script type="text/javascript" src="scripts/JS/MapView.js"></script> <script type="text/javascript"> $(document).ready( function () { var mapView = new PhoneGapMapApp.MapView(); mapView.init(); } ); </script> </body> </html>
In MapView.js added new methods for create collection of locations, load themarkers to the map, initiate and create the clusterer in the map. After fire devereday event belongs to cordova create the location collection. after the start to create the marker belongs to relevant location in the collection. after create marker collection form locations initiate and create the cluster view in the map. You can see the implementation in below code.

PhoneGapMapApp = {} PhoneGapMapApp.MapView = function () { this._map = null; this._currentLocation = null; this._locations = null; this._markerClusterer = null; } PhoneGapMapApp.MapView.prototype = { init: function () { this._defaultLocation = new google.maps.LatLng(6.5006036, 80.2711642); this._attachEventHandlers(); }, /** * Attach event handlers. */ _attachEventHandlers: function () { document.addEventListener("deviceready", this._onDeviceReady(this), false); }, /** * device APIs are available. */ _onDeviceReady: function (obj) { console.log('device ready'); obj._getRealContentHeight(); obj._loadMap(); obj._identifyCurrentLocation(); obj._loadLocationData(); obj._loadMapMarkers(); }, /** * Setup the content hieght. */ _getRealContentHeight: function () { var header = $.mobile.activePage.find("div[data-role='header']:visible"); var footer = $.mobile.activePage.find("div[data-role='footer']:visible"); var content = $.mobile.activePage.find("div[data-role='content']:visible:visible"); var viewport_height = $(window).height(); var content_height = viewport_height - header.outerHeight() - footer.outerHeight(); if ((content.outerHeight() - header.outerHeight() - footer.outerHeight()) <= viewport_height) { content_height -= (content.outerHeight() - content.height()); } $('#map_canvas').height(content_height); }, /** * create map. */ _loadMap: function () { var myOptions = { zoom: 4, center: this._defaultLocation, mapTypeId: google.maps.MapTypeId.ROADMAP }; this._map = new google.maps.Map(document.getElementById('map_canvas'), myOptions); }, /** * Identify current location. */ _identifyCurrentLocation: function () { if (navigator.geolocation) { browserSupportFlag = true; var that = this; var currentPositionCallback = function (position) { that._identifyCurrentLocationCompleted(position); }; var noGeolocationCallback = function () { that._handleNoGeolocation(browserSupportFlag); }; navigator.geolocation.getCurrentPosition( currentPositionCallback, noGeolocationCallback, { 'enableHighAccuracy': true, 'timeout': 20000 }); } else { browserSupportFlag = false; this._handleNoGeolocation(browserSupportFlag); } }, /** * Handles the situation when current location not found * or not allow from the user for access current location. */ _handleNoGeolocation: function (errorFlag) { this.goTo(this._defaultLocation); }, /** * Current location identify operation success callback. */ _identifyCurrentLocationCompleted: function (position) { this._currentLocation = new google.maps.LatLng( position.coords.latitude, position.coords.longitude); this.goTo(this._currentLocation); }, /** * Show current location in the map. */ goTo: function (position) { this._setMarkerForLocation(position); this._map.setCenter(position); }, /** * Set marker for location. */ _setMarkerForLocation: function (latLng) { var marker = new google.maps.Marker({ position: latLng, map: this._map, title: "You are here !!!" }); }, /** * Load markers for the map. */ _loadMapMarkers: function () { if (this._locations != null) { this._displayParksListInMap(); } }, /** * Create marker list from location details. */ _displayParksListInMap: function () { var markers = []; for (var locationIndex = 0; locationIndex < this._locations.length; locationIndex++) { var location = this._locations[locationIndex]; var marker = null; //Add new location to the markers var latLng = new google.maps.LatLng ( location.LocationLatitude, location.LocationLongitude ) marker = new google.maps.Marker ({ position: latLng, title: location.LocationName }); markers.push(marker); } this._initializeMarkerClusterer(markers); }, /** * Initialize marker cluster view in the map. */ _initializeMarkerClusterer: function (markers) { this._markerClusterer = new MarkerClusterer( this._map, markers, { maxZoom: 18, gridSize: 15 }); }, /** * Create local static data. */ _loadLocationData: function () { var location = {}; var locations = new Array(); location = { LocationID: 01, LocationName: 'Asiri Surgical Hospital', LocationLongitude: 79.880167, LocationLatitude: 6.894737 }; locations.push(location); location = { LocationID: 02, LocationName: 'The Asiri Central Hospital', LocationLongitude: 79.8658391, LocationLatitude: 6.9205805 }; locations.push(location); location = { LocationID: 03, LocationName: 'Majestic City', LocationLongitude: 79.8547562, LocationLatitude: 6.8940211 }; locations.push(location); location = { LocationID: 04, LocationName: 'Liberty Plaza', LocationLongitude: 79.8515386, LocationLatitude: 6.911252 }; locations.push(location); this._locations = locations; } }

Friday, April 4, 2014

Show current location of the PhoneGap map app

In last post I was described the way to develop PhoneGap map app using google map API v3. In this post Im going to show you how to get the user current location and show it on the map as marker. For this approach I use same code I wrote for the previous post. In below showing the implementation I did to achieve this task.

PhoneGapMapApp = {} PhoneGapMapApp.MapView = function () { this._map = null; this._currentLocation = null; } PhoneGapMapApp.MapView.prototype = { init: function () { this._defaultLocation = new google.maps.LatLng(6.5006036, 80.2711642); this._attachEventHandlers(); }, /** * Attach event handlers. */ _attachEventHandlers: function () { document.addEventListener("deviceready", this._onDeviceReady(this), false); }, /** * device APIs are available. */ _onDeviceReady: function (obj) { console.log('device ready'); obj._getRealContentHeight(); obj._loadMap(); obj._identifyCurrentLocation(); }, /** * Setup the content hieght. */ _getRealContentHeight: function () { var header = $.mobile.activePage.find("div[data-role='header']:visible"); var footer = $.mobile.activePage.find("div[data-role='footer']:visible"); var content = $.mobile.activePage.find("div[data-role='content']:visible:visible"); var viewport_height = $(window).height(); var content_height = viewport_height - header.outerHeight() - footer.outerHeight(); if ((content.outerHeight() - header.outerHeight() - footer.outerHeight()) <= viewport_height) { content_height -= (content.outerHeight() - content.height()); } $('#map_canvas').height(content_height); }, /** * create map. */ _loadMap: function () { var myOptions = { zoom: 4, center: this._defaultLocation, mapTypeId: google.maps.MapTypeId.ROADMAP }; this._map = new google.maps.Map(document.getElementById('map_canvas'), myOptions); }, /** * Identify current location. */ _identifyCurrentLocation: function () { if (navigator.geolocation) { browserSupportFlag = true; var that = this; var currentPositionCallback = function (position) { that._identifyCurrentLocationCompleted(position); }; var noGeolocationCallback = function () { that._handleNoGeolocation(browserSupportFlag); }; navigator.geolocation.getCurrentPosition( currentPositionCallback, noGeolocationCallback, { 'enableHighAccuracy': true, 'timeout': 20000 }); } else { browserSupportFlag = false; this._handleNoGeolocation(browserSupportFlag); } }, /** * Handles the situation when current location not found * or not allow from the user for access current location. */ _handleNoGeolocation: function (errorFlag) { this.goTo(this._defaultLocation); }, /** * Current location identify operation success callback. */ _identifyCurrentLocationCompleted: function (position) { this._currentLocation = new google.maps.LatLng( position.coords.latitude, position.coords.longitude); this.goTo(this._currentLocation); }, /** * Show current location in the map. */ goTo: function (position) { this._setMarkerForLocation(position); this._map.setCenter(position); }, /** * Set marker for location. */ _setMarkerForLocation: function (latLng) { var marker = new google.maps.Marker({ position: latLng, map: this._map, title: "Greetings!" }); }, }
The _identifyCurrentLocation method called by after create the map object. In this method has success callback and failure callback. In _setMarkerForLocation method set marker for the current location. If current location not found then app will shows the default location.

Wednesday, March 26, 2014

Google map with PhoneGap app

In previous post I was described the PhoneGap development with visual studio using Nomad extension. Today I'm going to make post about create a app using a google map. Here I'm using google map API v3 for do operation with map. following shows html page of the app.

<!DOCTYPE html> <html> <head> <title>Map View</title> <link href="style/jquery.mobile-1.4.2.css" rel="stylesheet" /> <meta name="viewport" content="width=device-width, initial-scale=1" /> </head> <body> <div data-role="page" id="map-page" data-url="map-page"> <div data-role="header"> Map </div> <div data-role="content" data-position="fixed" id="map_canvas"> <!-- map loads here... --> </div> <div data-role="footer"> Page footer </div> </div> <script type="text/javascript" src="scripts/jquery-1.9.1.min.js"></script> <script type="text/javascript" src="scripts/jquery.mobile-1.4.2.js"></script> <script type="text/javascript" src="scripts/cordova.js"></script> <script type="text/javascript" src="https://maps.googleapis.com/maps/api/js?v=3&amp;sensor=true&amp"></script> <script type="text/javascript" src="scripts/JS/MapView.js"></script> <script type="text/javascript"> $(document).ready( function () { var mapView = new PhoneGapMapApp.MapView(); mapView.init(); } ); </script> </body> </html>

Im using here Jquery Mobile and wrote JavaScript class called MapView.js which is using custom object pattern. Page contain with mainly 3 parts such as header, content and footer. Content div use to create the map. Following show the MapView.js which is include the basic operations for the map.

PhoneGapMapApp = {} PhoneGapMapApp.MapView = function () { this._map = null; } PhoneGapMapApp.MapView.prototype = { init: function () { this._defaultLocation = new google.maps.LatLng(6.5006036, 80.2711642); this._attachEventHandlers(); }, /** * Attach event handlers. */ _attachEventHandlers: function () { document.addEventListener("deviceready", this._onDeviceReady(this), false); }, /** * device APIs are available. */ _onDeviceReady: function (obj) { console.log('device ready'); obj._getRealContentHeight(); obj._loadMap(); }, /** * Setup the content hieght. */ _getRealContentHeight: function () { var header = $.mobile.activePage.find("div[data-role='header']:visible"); var footer = $.mobile.activePage.find("div[data-role='footer']:visible"); var content = $.mobile.activePage.find("div[data-role='content']:visible:visible"); var viewport_height = $(window).height(); var content_height = viewport_height - header.outerHeight() - footer.outerHeight(); if ((content.outerHeight() - header.outerHeight() - footer.outerHeight()) <= viewport_height) { content_height -= (content.outerHeight() - content.height()); } $('#map_canvas').height(content_height); }, /** * create map. */ _loadMap: function () { var myOptions = { zoom: 4, center: this._defaultLocation, mapTypeId: google.maps.MapTypeId.ROADMAP }; this._map = new google.maps.Map(document.getElementById('map_canvas'), myOptions); // Add an overlay to the map of current lat/lng var marker = new google.maps.Marker({ position: this._defaultLocation, map: this._map, title: "Greetings!" }); } }
To load the map here I'm using DeviceReady event belong to cordova. This event fire when phonegap fully loaded. The _getRealContentHeight method setup the height for the shows the map in the page. The _loadMap method create the map object and set the marker for already know location. In following image show the result of all this effort. 


Monday, March 17, 2014

Phonegap App development with VS and Nomad

Recently I was working with cross-platform mobile application development and I'm in a situation how to do it with visual studio. Another requirement was debug application with simulator. For fulfil these requirement I found Nomad extension for visual studio. This is support visual studio 2013, 2012 and 2013. I'm going to show you how to start development with nomad and visual studio.

First of all download extension form this link.
After you install nomad extension it will show up in visual studio project templates as shown in below.


 For create nomad project first you have to create PhoneGap build account or if you already have account use it. When project creating in visual studio, pop-up will appear and ask the credential of PhoneGap account. Enter login details create the project as shown in below. Enter project name as "MyFirstMobileApp". Then you can see visual studio create the project with basic files needed to develop cross-platform mobile application.


Project files contain with basic files of Jquery mobile javascript and style. Most importantly thing is project files contain with cordova.js file and PhoneGap configuration file.  And also this contain with index.html file which is the start page of the application all the time.

Go to project properties. In General tab shows the project settings as shown in below. In project setting page you can configure app display name, version, build option, cordova vesrion and preview your mobile app. In preview your mobile app section give you the option see your app through default browser or through Ripple emulator.


In Android and IOS tab you can configure build setting for PhoneGap. You have to setup those configuration first to make the build file from PhoneGap. Last tab in project properties is Artwork. In this tab you can upload splash screen and icons for Android and IOS.


As I mention earlier in this post project files contain with PhoneGap configuration file. You can do all PhoneGap configuration with config.xml file. Below image shows configuration file. Its shows all the configuration set up and icons uploaded to android and ios.


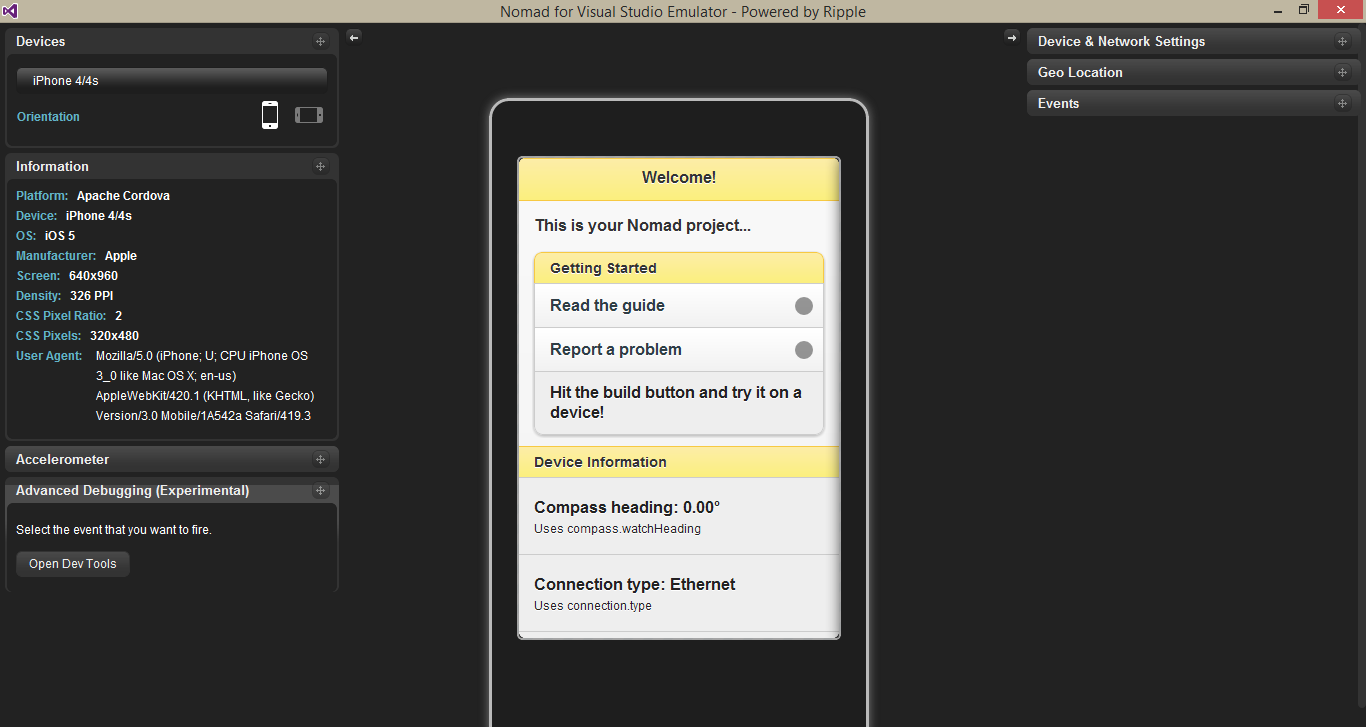
Run your project selecting Nomad for visual studio simulator from project properties under preview your mobile app. Then Ripple simulator shows up as shown in below.


You can see in this simulator shows many details like in native app development simulators.You can select different set of devices for android development. Also this shows the settings for accelerometer, geo location, device and network settings and events. Clicking on 'Open Dev Tools' you can debug your JavaScript code and check your html.


In this article describe the information for the start cross-platform mobile app development with Nomad and Visual Studio. In next article describe the creating mobile application with Nomad and JQuery Mobile. 

Tuesday, February 18, 2014

The Arrival of NoSQL

In business system analysis one of the main part is how system data being store, retrieve and manipulate to business operations. End result of this process is create the schema for the business system. This schema consist with collection of relation tables and views. But in this relational database model its own limitation and drawbacks. We can list down some of factors as in below.
  • Relational database model can take long time to perform complete data analysis and design schema. In business user expect their system quickly up and running. 
  • Relational database design consist with tables and developers should access it using SQL. But business logic develop through objects and methods. So overcome this mismatch between database model and programming model, we have to use ORM like Entity Framework.
  • Relational databases are very difficult to modify if more application depends on it. If change one place it can effect to the many place in the business application.
  • In some scenarios relational database not able show all business requirement relationship. 
  • Many high end relational database systems more expensive when going for a scalability and high - availability. And also licencing cost for the product.  
To address these limitation of flexibility, availability, Performance and scalability which has in relational database brought NoSQL database to the table.  In other words "Non - Relational Database". NoSQL databases categorize  into a small set of functional areas: key/value stores, document databases, column-family databases, and graph databases.  

Key/Value stores

A key/value store implements simplest of the NoSQL storage mechanismsl. A key/value store is large hash table. Each data value associate with a unique key, and the key/value store uses this key to determine where to store the data in the database by using an appropriate hashing function. The hashing function is selected to provide an even distribution of hashed keys across data storage. 


Document Databases

A document database is similar in concept to a key/value store except that the values stored are documents. A document is a collection of named fields and values, each of which could be simple scalar items or compound elements such as lists and child documents. The data in the fields in a document can be encoded in a variety of ways, including XML, YAML, JSON, BSON, or even stored as plain text.

Column-family Database

A column-family database store its data into rows and columns, and in its simplest form a column-family database can appear very similar to a relational database, at least conceptually. The real power of a column-family database lies in its denormalized approach to structuring sparse data.

Graph Databases

Same like other categories of NoSQL databases, a graph database enables to store entities, but the main focus is on the relationships that these entities have with each other. A graph database stores two types of information; 
  • Nodes which is instances of entities 
  • Edges which specify the relationships between nodes. 
Nodes and edges can both have properties that provide information about that node or edge just like columns in a table. Edges can have a direction indicating the nature of the relationship. The purpose of a graph database is to enable an application to efficiently perform queries that traverse the network of nodes and edges, and to analyse the relationships between entities. 

Wednesday, February 12, 2014

Threading to JavaScript 3


The second post of this article series shows small application with web worker. This post going to shows web worker with JSON. Please refer first post and second post.

Following shows main page HTML structure. Main page has three buttons with respective onclick event handler. One button for send JSON data to the web worker, another button for get JSON data from web worker and third button for terminate web worker from JSON message.

Web worker demo

Following shows main page JavaScript code. First part of this code contain implementation for start web worker and it contain with onmessage event listener for web worker object. After that it has implementation of onclick event handler in each buttons. Inside those methods create JSON object to send web worker. 

Following shows doWebWorker.js file implementation. Inside the switch statement check JSON object. For Get request create new JSON object and send back to the main page.

var message;
that = this;
self.addEventListener('message', function (e) { 
 
 var data = e.data;
 switch (data.cmd) {
  case 'send':
   that.sendMessage('WORKER RECEIVED JSON DATA: ' + data.msg);
   break;
  case 'get':
   var val = {
    'cmd': 'WORKER SEND JSON DATA',
    'msg': 'worker said hi !'
   }
   that.sendMessage(val);
   break;
  default:
   that.sendMessage('WORKER STOPPED: ' + data.msg);
   // Terminates the worker.
   that.terminatesWorker();
 };
}, false);

function sendMessage(message)
{
 self.postMessage(message);
}

function terminatesWorker() {
 self.close();
}

Final result looks like shown in below.


Result of Send Json button click

Result of Get Json button click

Result of Stop Worker button click